Wednesday, December 30, 2015

Apply Dynamic JDBC in ADF Application (Step-by-Step)

In some situations the business require that ADF application can connect to different database users depending on the login user. For example if user1 login, the ADF application will connect to database user hr/hr. If user2 login, the ADF application will connect to database user hr2/hr2.
This is call Dynamic JDBC.

In this url you can see how to apply this dynamic JDBC, but in my post I will simplify this url by creating a sample ADF application and go step by step for how to apply dynamic JDBC to this ADF application.

I use JDeveloper 11.1.2.4.0.

Note: From Step1 to Step5 it just steps for creating a simple ADF application. Applying the Dynamic JDBC to this simple application is starting from Step6.

Step1:
Create a simple ADF Application connect to "hr" database, this application will contains only 1 ViewObject (Employees) and will contains 2 jspx pages (login.jspx and emp.jspx)


Step2:
From faces-config.xml --> Navigation Rules define outcome to the two jspx pages.
login.jspx---> login
emp.jspx----> emp


Step3:
- In the login.jspx page add two inputTexts (Username and Password) and one command button for login.
- Bind Username inputText and Password inputText to the back bean.
- Create action for the login command button to read the username and password then navigate to emp.jspx page.


Step4:
In the emp.jspx drag EmployeesView1 to the page and add logout link to the page 


The back bean should be:


Step5:
Run login.jspx page.

Now we have created a simple ADF application and we will now apply dynamic jdbc to this application.

Step6:
Open AppModule and set "Connection Type" to JDBC URL for both AppModuleShared and AppModuleLocal


Step7:
In the login button action we will store username/password it in session.
The login button action will be:


Step8:
Create new Filter (DynamicJDBCBindingFilter.java) extends ADFBindingFilter.


Step9:
Create Class (DynamicJDBCEnvInfoProvider) as


Step10:
Create Class (DynamicJDBCHttpSessionCookieImpl) as


Step11: 
Create Class (DynamicJDBCSessionCookieFactory) as


Step12:
In web.xml update adfBindings and make it point to DynamicJDBCBindingFilter


then add filter mapping to adfBindings filter


Step13:
In AppModule update jbo.ampool.sessioncookiefactoryclass in AppModuleLocal and AppModuleShare to point to DynamicJDBCSessionCookieFactory


Step14:

Now run login.jspx and login with database username/password = hr/hr you will successfully login and  get the data


Logout then login again with wrong password as hr/hr1 you will get "Invalid username/password".


You can download the sample application from here


Tuesday, December 29, 2015

Get JDeveloper and ADF Icons and Styles

Some developers want to get some icons which used in ADF components or JDeveloper. Examples of these icons (edit icon, LOV icon, undo icon,...) or get some css files which used for styling.

You can find these icons and css files on the jar file adf-richclient-impl-11.jar

You can find this jar in the path like:

C:\Oracle\Middleware\oracle_common\modules\oracle.adf.view_11.1.1\adf-richclient-impl-11.jar


You can extract this jar file then open "adf" folder and you will find 2 folders:

1-  "images" this folder will store icons.
2- "styles" this folder will store css files.


Friday, December 11, 2015

ADF Table Filter Case Insensitive and Search by Contains Instead of Start With

In ADF table if you enable column filter this filter by default will search by "start with" and it will be case sensitive . For example in table employees if you have employee name = Hermann and you try to search by "man", the search will return no result


but if you search by "Herm" it will return result


If you try to search by "herm" it will return no result.


This is because the filter by default is case sensitive and will search by start with.

In many cases we need the all tables filters be case insensitive and search by contains not start with. You can search by case insensitive by setting filterFeatures="caseInsensitive" for  each af:column but you need to do this in all af:column in your application and it will not be a proper solution.

You can search with contains by typing your string between '%', but we need something to be more easy than typing %.

To make the the ADF table filter be case insensitive and search by contains follow these steps:

1- In model project create new class "CustomViewImpl" this class should extend oracle.jbo.server.ViewObjectImpl


2- In this class override getCriteriaItemClause(ViewCriteriaItem viewCriteriaItem) and write this code:


3- Go to Model --> Project Properties --> ADF Business Components --> Base Classes --> View Object --> change Object to point to your CustomViewImpl class


4- Open ViewObject --> Java --> Java Classes --> Generate View Object Class


5- If you open the generated ViewImpl class you will find it extend the CustomViewImpl class


6- Run the application and test.

You can download the sample application from here

(This sample developed in JDev 11.1.2.4.0)


Monday, November 23, 2015

Call Restful Web Service from JAVA programmatically

In my previous post I have shown how you can create a Restful web service, in this post I will show how you can call this web service programmatically.

Before start you should download the sample web service from here and run the web service.

Follow These Steps to call the web service:

1- From JDeveloper create new custom application


For example, Application Name: CallRestfullWSProgrammatically

2- In this application create new class


For example, Class Name : CallRestfulWS.java

3- In the project properties add 2 libraries

- jersey-client-1.18.jar
- jersey-core-1.18.jar

You can get these jar files from the uploaded sample application


4- Write this code for the main method


5- Run the main method (Right Click ---> Run)


Download the sample application (done using JDev 11.1.2.4.0) from here


Thursday, July 30, 2015

Control ADF application Passivation Mode

In your ADF application you can set the session timeout of the application according to customer requirement.
If one of the customer want the application to be active for 3 hours what you will do?
The first thing you will think about is the session parameter (and you are right), you will open web.xml and set session timeout to 180


After setting the session timeout parameter you will deploy the application and the customer will test the application. Customer will login and will leave the application idle for 2 hours and will return back to the application he will find the session still active and it is ok. After the user try to use the application he will find the application will be in unexpected behavior and he will get some errors and he will find a lot of issues in the application.. why this issues happened?
because the application entered to the passivation mode.
Now you will ask me some questions like:
1- What is the passivation mode?
2- When the application will entered in the passivation mode?
3- What I have to do when the application become in passivation mode?
4- How can I test my application in passivation mode to test the application behavior in that mode?
5- How can I control the time that make the application to be in the passivation mode?
6- How can I configure my application to avoid the passivation mode?

I will answer all these questions:

1- What is the passivation mode?
In short description passivation mode will manage system resources. If you leave the application idle for along time the resources (database pool - memories - .. ) may gone to another active application and in this case your application will be in the passivation mode.
You can check this for more information about passivation

2- When the application will entered in the passivation mode?
By default after you leave the application 1 hour the application will enter to passivation mode. or passivation can happens under high loads

3- What I have to do when the application become in passivation mode?
logout from the application and login again.

4- How can I test my application in passivation mode to test the application behavior in that mode?
Open AppModule and uncheck "Enable Application Module Pooling" for both local and shares then run the application.


5- How can I control the time that make the application to be in the passivation mode?
In the AppModule there is 2 parameters you have to set
jbo.ampool.maxinactiveage and jbo.ampool.timetolive

jbo.ampool.timetolive=-1
jbo.ampool.maxinactiveage=<ridiculously large number>

For better performance you can set these to paramaters as well
jbo.doconnectionpooling=true
jbo.txn.disconnect_level = 1

as mentioned here


e.g:
jbo.ampool.maxinactiveage=18000000
jbo.ampool.timetolive=-1
jbo.doconnectionpooling=true


jbo.txn.disconnect_level = 1

time in maxinactiveage will be in ms so 18000000 is 5 hours.
These previous configurations means the application will enter the passivation mode after 5 hours.


6- How can I configure my application to avoid the passivation mode?
To avoid passivation mode you have to set the session timeout with value less than the passivation value.
e.g 

If the customer want the application to be active for 3 hours you can set session timeout to 180 (3 hours) and set passivation parameters to be 4 hours

jbo.ampool.maxinactiveage=14400000
jbo.ampool.timetolive=-1

Thursday, June 4, 2015

Call Secure SOAP Web Service In ADF Application Using DataControl

In this post I will explain how in ADF application you can call secured Web Service where this web service is secured by username token.

Assume you have the WSDL URL of SOAP Web Service like this:

http://serverIp:port/myws/MyWSPort?WSDL

In My Example the wsdl is:

http://192.168.1.39:8000/corews/CAPISalesOrderWebSPort?WSDL

You can run this url in the browser to be sure that web service is running and secured by username token as:


- In the server which the web service was deployed in, open the console -->Security Realms --> myrealm --> users

create user. for example username= wsuser and password=ws123456


This user will be used when we call Web Service

- Now make ADF application and from ViewController project right click --> New --> Web Service Data Control


- Enter Data Control name and web service wsdl url


- Select the function which you want to use from web service


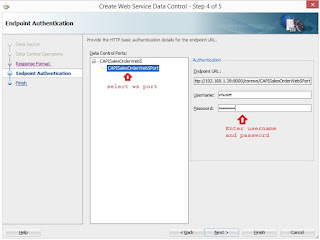
- In Endpoint Authentication step select web service port and enter username and password (in our example username=wsuser - password = ws123456)


- Press Finish.

- After finishing the new data control will created select it and go to structure window --> right click on the data control -->  Define Web Service Security


- From the security list check on " oracle/wss_username_token_client_policy" then press "OK"


- In adf application create new .jspx page and from Data Control drag web service function and drop it in the page


- Drag web service output and drop it in the page as ADF Output Text


- Run ADF page.
- Enter web service parameter then press the button you will get the web service output.


Wednesday, May 20, 2015

ADF Custom Security

In this post I will explain how to use custom security in ADF application without using ADF security.
When you develop ADF application and want to deploy it in Glassfish or tomcat using adf-essentials you will find a problem with ADF security, in this case you have to find a new way to apply the security in your ADF application. In this post I will explain how to use java filter to apply security in ADF application. User information and user privileges will stored in database and after user enter username and password you have to check if it is correct or not from database and store user information and user privileges in a variables in session scope.

Follow this steps to apply custom security in your ADF application:

1- Make new ADF application (e.g ADFCustomSecurity).
2- Go to ViewController project property and set JavaEE Application and JavaEE web context root to a short name like(welcome)


3- Make new java class implement javax.servlet.Filter, you can name this class (ApplicationFilter)


4- Make 4 pages:
 
    * index.jsp


    * index.jspx


* login.jspx


This page will use back bean to check username and password this back bean should be like this:


  * welcomePage.jspx


5- Open web.xml and add this:


6- In the face-config.xml add outcome to your welcomePage (e.g welcome)


7- When you deploy this application in tomcat or glassfish you may need jar file for jstl you can add this jar file inside public_html\WEB-INF\lib (you can get this file from the uploaded application)

8- Your application structure should be like this:


9- Deploy the application in weblogic or glassfish or tomcat.


10- To access the application just write "http://serverIp:port/welcome" where welcome is the context root of the application. After you write this short URL the application filter will redirect it automatically to login page.

11- After successfully login you will navigate to the welcomePage.

Note: if you successfully login and you see the welcome page then if you close the browser tab (not close the fully browser window) then open new tab and write the application url  "http://serverIp:port/welcome" it will automatically navigate to the welcome page because the browser still maintain the session


You can download this sample application from here this application developed using JDeveloper 11.1.2.4.0


Apply Basic Authentication In Glassfish

In this post I will explain how you can configure Glassfish instance (server) with basic authentication. If you deploy any java application or ADF application or web service in the Glassfish instance the user who will use this application or web service will be prompted to enter username and password.

To do so follow this following steps:

1- Open Glassfish admin console then go to:
Configurations --> Server-config --> Security --> Realms --> file


2- Enter "USERS" in Assign Groups


3- Press in "Manage Users" button


4- Press New to create new user and set Group List to "USERS"


5- In your web application add this in web.xml


6- In your web application create file "sun-web.xml" in the same place of web.xml and write this:


7- Now deploy the web application (Java, ADF ,Web Service,...) to the Glassfish and when you try to call the application you have to enter username / password


Thursday, May 7, 2015

Create Restful Web Service In JDeveloper 11g

You can easy create Restful web service in JDeveloper 12c because it become built in.

But in JDdeveloper 11g  you can easy create JAX WS because it is built in, but Restful WS not built in JDev 11g so, if you want to create Restful WS in JDev 11g follow this steps:

I used JDeveloper (11.1.2.4.0) for this sample application

1- From Jdveloper create new custom application (e.g RestfulApplication).
2- In the Project ---> Properties -- Libraries And Classpath ---> Add JAR/Directory andd add those jars (you can get those jars from the attached application):

- asm-3.1.jar
- jersey-core-1.18.jar
- jersey-server-1.18.jar
- jersey-servlet-1.18.jar


3- Create new class (e.g RestClass.java) and add a simple function (sayHello) will take String and return the "Hello: ".


4- Over class name add this notation @Path("hello")
5- Over the sayHello method add this notation  @GET
6- Before function parameter add this notation @Encoded @QueryParam("myName") 


8- You will find a warning icon in the @Path notation select it then select "Configure web.xml for jersey JAX-RS Web Service"


9- The Warning will gone and a new web.xml file will created.


10- Right click on the web service --> Test Web Service.


11- Result:


You can download the sample application (JDeveloper 11.1.2.4.0) from this URL:


If you want to know how to call this web service programmatically you can check this post