Artificial Intelligence (AI) and Machine Learning (ML) are no longer reserved for data scientists and tech experts. Thanks to Oracle AutoML, you can build powerful machine learning models without any deep knowledge of AI or coding. Whether you're a business professional or a developer, Oracle AutoML makes the model-building process effortless, allowing you to harness the power of AI within minutes.
What is Oracle AutoML?
Oracle AutoML is a no-code machine learning solution offered as part of Oracle Machine Learning (OML) on Oracle Autonomous Database. It simplifies the end-to-end ML workflow by automating the most complex steps, such as feature engineering, algorithm selection, and hyperparameter tuning. With Oracle AutoML, even users without prior knowledge of machine learning can build, train, and deploy highly accurate models.
In this post, I'll show you how to easily set up the AutoML service on Oracle Autonomous Database using the Always Free tier:
1- Access OCI console (if you don't have an account, you can create a free account from https://www.oracle.com/cloud/free).
2- From the main menu select "Oracle Database" then "Autonomous Database"
3- Select Compartment then press on "Create Autonomous Database" button
4- Enter "Display Name", "Database name", select Data Warehouse, deployment type Serverless, select Always Free and database version as shown
5- Enter Database Admin password then press "Create Autonomous Database" button
6- You will need to create database user where the user will be used to access and deal with Oracle Machine Learning. So wait until the database status to be Available then select database and from Database actions select Database Users.
7- Press "Create User"
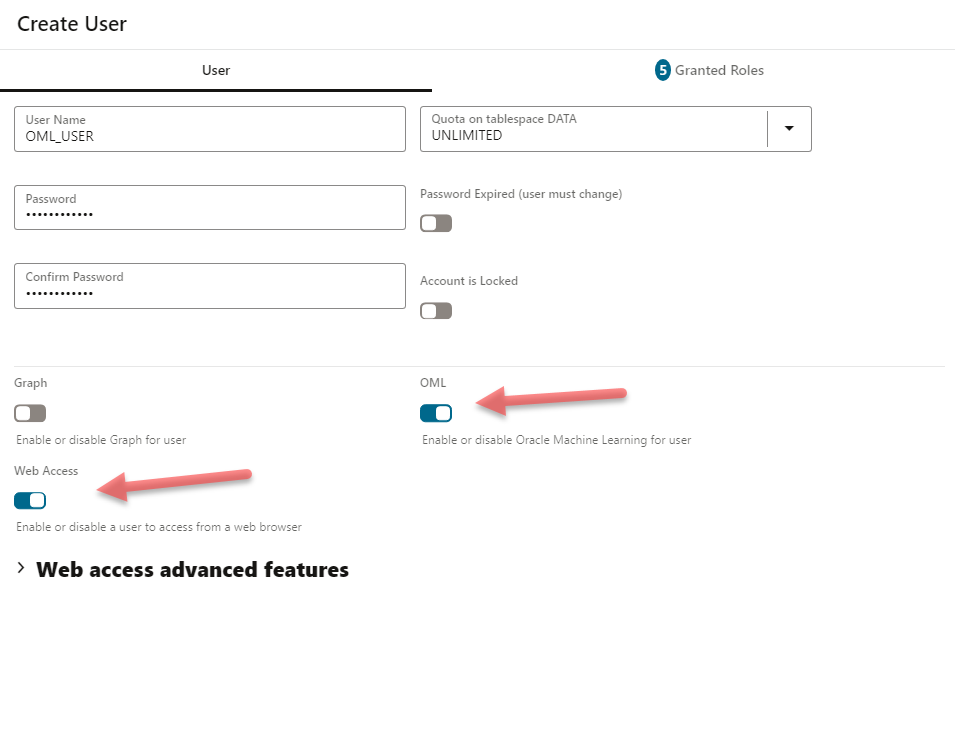
8- Enter username, password and select OML and Web Access then press "Create User" button
9- We will use this user to access the Machine Learning console. But now let us create table in the database with the data which we will need to build the model. Back to Autonomous Database and select "Database actions" then SQL
10- Log out from SQL editor and login with the new created user which we created in step 8 then press Data Load.
11- In this example, we want to predict the "AccountId" from the GL Accounts table (F0911). So, I will export the GL Accounts table to a CSV file. If you're using the Always Free tier, you should reduce the number of records because the free tier has limited resources, and training with too much data can take a long time. In this example, I will train the model with about 1,500 rows. Once you've refined the CSV file, upload it and click "Upload."
12- Now, the table we want to use to create the machine learning model is ready in the database.
13- Let's access Machine Learning console to build the model. Back to Autonomous Database and select Tool configurations then select "Copy" URL for Oracle Machine Learning user interface
14- Open Oracle Machine Learning user Interface and enter database user credentials
16- From AutoML Experiments press "Create"
17- Enter name, comment and select Data Source. Select OML_USER and select our table
18- From Predict, select the target column which you would like to predict (in this example I will choose ACCOUNT_ID). From the Prediction type select "Classification". If the table has a unique primary key, you can select it in Case ID
19- You can leave everything else as default, and AutoML will test different algorithms and score each one. It will also identify the most important columns for predicting the target (Feature Columns). AutoML will fine-tune the models and provide the best score for each.
In the additional settings, you can define how many top models with the highest scores should be displayed after AutoML finishes (the default is 5 models). You can also set the maximum running time. The model metric is set to "Balanced Accuracy" by default, but you can change it based on how you want to evaluate the model. In the algorithm section, you'll see all available algorithms for classification models, and you can choose specific ones for AutoML to train with. If you select all (which is the default), AutoML will take a bit more time to train the data and check accuracy.
20- Press "Start," and you'll have the option to choose between "Faster Results" or "Better Accuracy." (Choosing "Better Accuracy" will take more time to build the models.) I'll select "Faster Results" and wait until the models are ready. The time it takes to build the models will depend on the number of algorithms, feature columns, and rows.
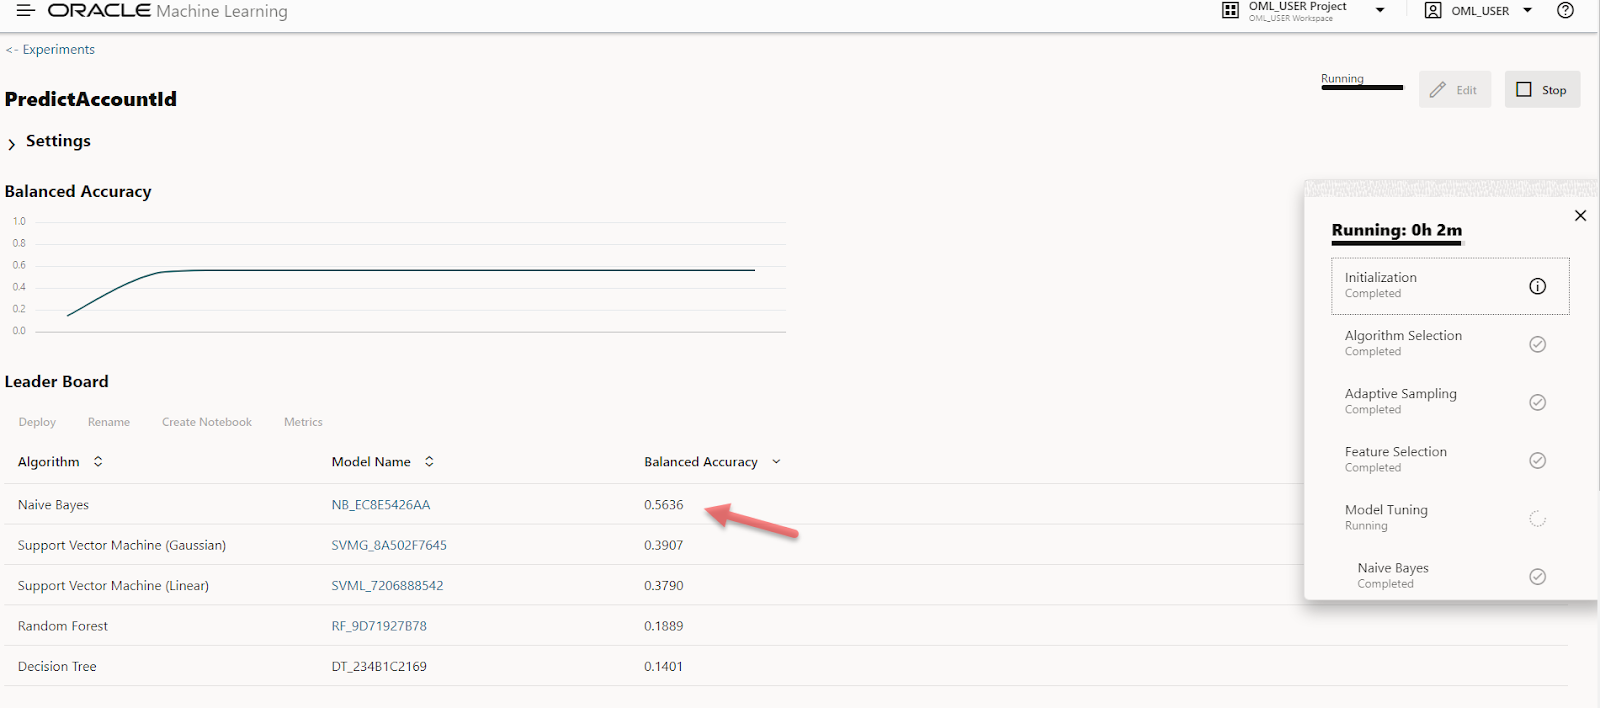
21- Once it finishes, it will display the top 5 models, sorted by score from highest to lowest. At the bottom, you'll find the feature columns used to predict the target column, along with the importance of each feature column.
22- Select the model with the highest accuracy and click "Deploy."
23- Enter the deployment name, the URI (which will appear in the REST API URL), the version, and select the "Shared" option if you want other users to access it, then click "OK."
24- After model is deployed, from main menu select "Models"
25 - Select the Deployments tab and you will see the deployed model
26 - To get model REST API URL press URI
27- From the opened popup we will get API URL and payload input data.
28- Oracle Machine Learning Services REST APIs use tokens to authenticate an Oracle Machine Learning Services user. To get token you will need the following:
- URL: <oml-cloud-service-location-url>/omlusers/api/oauth2/v1/token
The oml cloud URL will be the URL of the OML (highlighted red)
- Database User: (in our example: OML_USER)
- Database user password
- Open Postman and call it as shown
29- Now we are ready to involve our model Rest and reive the predicted account. The URL of the model will be
<oml-cloud-service-location-url>/omlmod/v1/deployment/<score_path>
You can get the score path from model URI
The input to the model will be array of inputRecords and to get record name and type, press on the deployed model name as shown
So the input payload will be like
{
"inputRecords":[
{
"ADDRESS_NUMBER": 3480,
"AMOUNT": 520,
"BUSINESS_UNIT": 5300,
"CO": 50,
"CURRENCY": "USD",
"EXPLANATION_ALPHA_NAME": "Digger Incorporated"
}
]
}
30- Let us open Postman and invoke model score. In Authorization select Bearer Token and set token
Then set input JSON payload as shown
be sure you send a payload with the correct data type, so if the type is numeric and you send it as a String you will get an error. For example if I sent Amount as String I will get an error as shown
31- As this is a Classification model, the response will be all possible values with probabilities for each value. The response will not be sorted by you can sort the response using a programming language like JS:
const response = { };
const sortedClassifications = response.classifications.sort((a, b) => b.probability - a.probability);
console.log(sortedClassifications);
Then you can take the highest probability value.