Wednesday, March 25, 2015

ADF table detail stamp set expanded row as a current row and close others expanded rows

I got a lot of questions about table detail stamp how user can set the expanded row to be the current row and closing any other expanded rows (one row will be expanded at a time).

To do that follow this steps:

1- In .jspx select the table and go to property and set RowDisclosureListener to a method in back bean (e.g method name will be rowDisclosureListener)

2- In back bean write this code


3- Run your application and expand any row you will find the expanded row become current row and close any other expanded row

Wednesday, March 11, 2015

Create Custom Converter

Sometimes when you develop application to the customer he want to see data in specific format although it stored in the database in other format for example:

Assume you have a table store mobile number in this format 3538xxxxxxxx but the user want to see this mobile number in this format 08xxxxxxxx.

It means when you read the mobile from database (in this format 3538xxxxxxxx) you should convert it (to 08xxxxxxxx) before displayed in the screen.
and vise versa when the user enter mobile number in this format 08xxxxxxxx it should store in the database in this format 3538xxxxxxxx

To make this follow this steps:

1- Create java class implements javax.faces.convert.Converter (e.g MobileNumberConverter.java)


2- Open faces-config.xml and go to Converters and create new converter


3- Go to inputText component and insert inside it f:converter then select your custom converter (MobileConverter)


You can make your own converter depending on your business need like making convert for dates sometimes customer need to enter date in specific format and store in database in other format.

Run ADF Application In IE11

In this post I will show how you can run ADF application developed by JDeveloper 11g in Internet Explorer 11 (IE11).

- In ADF application create new java class (e.g IECompatibilityFilter.java)


- In web.xml add this


- Run the application using IE11.


Thursday, March 5, 2015

ADF Graphs Configurations

In this post I will show how you can make some configurations on ADF graphs.

1- Change Y-axis minimum vale

Sometimes you need to start Y-axis by specific value (by default it start by 0) but what if you need Y-axis start by 20 or 50 or .... you can do the following:

Settings:

In the graph component insert dvt:y1Axis  and from property inspector set AxisMinValue by the the desire value or by expression and set AxisMinAutoScaled to false


The Result will be like this:


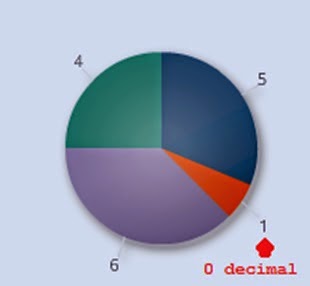
2- Remove decimal from pie slice label(display integer values) 

Settings:


Result:


3- Change X-axis fonts and color

Settings:


Result:


4- Change Y-axis fonts and color

Settings:


Result:


5- Rotate X-axis text 

Settings:


Result:


5- Pie display value 

Settings:


Result:


6- Pie display percentage

Settings:


Result:


7- Change Pie Slice label text fonts and colors

Settings:


Result:


8 - Pie change Legend text fonts and colors

Settings:


Result:


9- Pie select multiple slices

Settings:


Result:


To read selected value you can use this code


10- Hide graph tooltip

Settings:


Note: You can use MarkerTooltipType and SeriesTooltipLabelType properties to display/hide some information from graph tooltip


Result:


11- Display a horizontal line inside bar graph

Sometime we need to display a horizontal line in bar graph the line value will be a specific value to know which bar value will be above the line and which will be below the line value.

To do that insert inside dvt:barGraph --> referenceObjectSet --> referenceObject

as


Settings:


Result:


12- Change bubble graph background and vert/horiz lines color

The original graph will be like this 


You can fill the graph by set dvt:graphPlotArea fillColor="#bac5d6" and fillTransparent="false" as


the result will be like


if you want to change the color of the vertical and horizontal lines you can change it by adding dvt:y1MajorTick and dvt:x1MajorTick inside  as


the result will be like:


If you want to hide all vertical and horizontal lines set dvt:y1MajorTick and dvt:x1MajorTick as


The result will be


13- Formatting Metric and Tick Labels for a Gauge

the metric and tick labels are by default displaying their values as e.g "2.0K". Also, the metric label is displayed below the gauge which takes unnecessary vertical space.

if you want to display the values like 2000 instead of 2.0K :

Settings:

set gauge tickLabel and metricLabel scaling="none"


Result:


14- Display bar values of dvt:barGraph in the top of each bar

Inside the bar add dvt:markerText like:


Result:


15- Add currency symbol beside gauge value

To add currency symbol beside gauge value add inside gauge dvt:metricLabel and inside it add  dvt:numberFormat as:


Result:


Tuesday, March 3, 2015

Oracle BPM: Initiate Oracle BPM Process Using Web Service

In this post I will explain how to initiate Oracle BPM process using Web Service. Sometimes you need to start process using non human action depending on business needs.
To do so follow the following steps:

1- Create a simple BPM process like this


2- In BPM project define business object (this will be the web service input parameter).


3- In Process Data Object define dataobject based on the created business object


4- In process Start event configure it like this 


5- Select Data Associations like this


6- Deploy BPM Application.

7- You can get Web Service WSDL URL from EM.


Sometimes you will receive error message like this


If you received this message then first you have to open Service Properties 


Then try to open Test Service again it should be open without errors

8- You can test web service from em as


9-  After invoke web service, BPM process will start and receive data from web service and fill process object data