Sunday, December 9, 2012

Using Jasper Report In ADF Application (Step-by-Step)

In my previous post  http://sameh-nassar.blogspot.com/2009/10/using-jasper-reports-with-jdeveloper.html I explain how to use Jasper Report but because of many people send me many requests for explain this topic in more detail so I will explain it in step by step.

our example will make application with one screen this screen has a table of employees you should select an employee and send the selected employee id to jasper report to print the selected employee data.

Before we begin be sure of:

1- You download iReport-4.0.1 (you can get it from http://sourceforge.net/projects/ireport/files/iReport/iReport-4.0.1/) I download iReport-4.0.1-windows-installer.exe.

2- You have database has hr schema.

3- Setup JDeveloper 11g (any release).

Now we can begin ......

Step 1:

Setup iReport-4.0.1
Step 2:
Open JDeveloper and make new ADF Application (name it for example JasperApplication)

Step 3:

Connect your application to your database HR Schema by right click in your Model application ---> new ---> ADF Business Components ---> Business Components From Table
Add your connection and test the connection

Add one Entity Objects (Employees)
Add one Updatable View Objects
Then press finish, your application should be like this
Step 4:
Create new jspx page (name it for example employees.jspx)
In your ViewController project right click on Web Content folder then new --->JSF ---> JSF Page

From the Data Controls drag EmployeesView1 to your page as an ADF Read-only Table


From Row Selection Select Single Row
Add a button above a table (text it for example Run Report) and its action point to a method in a back bean (for example Back bean name is JasperBean.java)


To get the selected employee id:
    DCIteratorBinding empIter = (DCIteratorBinding) getBindings().get("EmployeesView1Iterator");
    String empId = empIter.getCurrentRow().getAttribute("EmployeeId").toString();

where EmployeesView1Iterator is the iterator name in the page definition and EmployeeId is the attribute name in the EmployeesView.

now we should pass the selected employee Id to jasper report so, you should make a map and set the parameter like
    Map m = new HashMap();
    m.put("employeeId", empId);// employeeId is a jasper parameter name

then you should call the jasper report like this method
 runReport("empReport.jasper", m);

where runReport is the method take jasper report name (empReport.jasper) and the map which hold the parameter

write this code in your JasperBean.java

--------------------------------------------------------------------------------------------------------------


--------------------------------------------------------------------------------------------------------

After you write this code you will find Jasper library missing

to get jasper libraries goto the folder which you setup iReport for example in this path
C:\Program Files (x86)\Jaspersoft\iReport-4.0.1\ireport\modules\ext
and get these libraries:
1- iText-2.1.7.jar
2- jasperreports-4.0.1.jar
3- jasperreports-fonts-4.0.1.jar

add this libraries to your ViewController project ---> Right click on the project ---> Project Properties--->Libraries And Classpath ---> Add JAR/Directory

Now your code should have no error

Now my Back bean code is :
----------------------------------------------------------------------------------------------------------------------


--------------------------------------------------------------------------------------------------------------------------
Now depending on my previous code we should make a report the name of this report should be "empReport" and has one parameter "employeeId"

Step 5:

Open iReport and make a connection to hr database but first ..... iReport has not oracle database driver so you use oracle database you should first add a ojdbc jar file to the classpath of iReport.

you can get ojdbc jar file in your middleware home like:
C:\Oracle\Middleware\wlserver_10.3\server\lib and search for ojdbc6.jar

In iReport goto Tools---> Options ---> Classpath and add ojdbc6.jar
Now make a new connection to hr schema
Now from File ---> New and make new Report
Choose any template or make it blank then press "Launch Report Wizard"

Write report name "empReport" and under your web content folder in ViewController project make new folder "reports" and save the report on this path


Press on Design query button and select your schema then drag Employees table
then press Ok you will find the report query will generated then press Next and shuttle the field you want to displayed in your report
Then press next then finish. You will find you report generated.
Goto the report query as shown:

and make new Parameter "employeeId"
add where clause to the query like:
WHERE EMPLOYEES."EMPLOYEE_ID"=to_number($P{employeeId})

Now you can preview your report by pressing on "Preview" button and enter for example employeeId = 200


Now compile your report to generate .jasper file in your application
If you goto your application you should something like this:
before you run be sure of two things:
1- any picture you use in jasper should be in the class path
2- You should define datasource in your weblogic "as we write in the code datasource is hrDS"


for how you can define data source in weblogic try this http://www.mediafire.com/file/g7odbc06rpad1aa/dataSourceInWeblogic.doc/file

Step 6:
run your application and select any employee then press on "Run Report" button
for example select employee Id= 104 then run report


you can download the application from this link JasperApplication


To open the report in new window:

1- In the .jspx right click on the af:document -->Facets - Document --> Meta Container 
2- Inside f:facet - metaContainer add af:resource with type="javascript" as:


inside af:resource you can add javascript function 

function newWindow()
{
  document.getElementById("f1").target = "_blank;targetfeatures=toolbar=no location=no directories=no menubar=no";
}

where "f1" is the af:form id.

So the structure will be:


To call this function add button or link and inside this link add clientLister as:


Thursday, May 17, 2012

Call Oracle Reports From Your ADF Application (Hide Report Parameters From URL)

Hello ADF Developers,

In my previous post http://sameh-nassar.blogspot.com/2010/07/call-oracle-reports-from-your-adf.html I explain a way to call oracle report but this way has a problem. The problem is the report parameters appear in the URL. In this post I will explain another way to call oracle report without displaying report parameters in URL.
to call oracle report follow this steps:
1- Make a new .jsp page (for example the page name is  report.jsp).

2- In faces-config.xml make a navigation rule to report.jsp with outcome "report".

3- Write this code inside the report.jsp page


4- Create ADF page (.jspx or .jsf page) then add button (this button will call the report) and in the button action write this code:


Wednesday, March 21, 2012

Apply MDS To Oracle ADF Application

What is MDS?
Metadata Services (MDS) is a feature provided by oracle to store customization and personalization information in a repository. The repository can either be stored in a database or in a file system as we will see.

for example if there is a screen has a table this table has 8 columns, and there are a user (User1) want to see only 4 columns and hide the others. When User1 login again he want to see last changes which he make (see only 4 columns), the user can see any changes he make in the screen only if you apply MDS to your application.

To apply MDS to your application follow this:

1.Pages should be (.jspx) not (.jsp).
2.In your project properties --> ADF View check on "Enable User Customizations" then select "Across Sessions Using MDS".


3.Create a new class like this


This class has two main functions:
- getName() which return the folder name that hold all users changes.
- getValue() which return the folder name for the login user. This folder should be unique for every login user and will saved inside the getName() folder.

4. In Application Resources --> Descriptors --> ADF META-INF open adf-config.xml.
5. In adf-config file go to MDS Configurations and add your class


6. In adf-config file go to View tab and add all Tags.


7. Now you apply MDS to your application.

8. If you run your application in Integrated Weblogic there will be no problem, you should only specify the path to store the users changes (changes will stored in file system). You will find this path in your Application properties --> Run --> MDS.


9. If you deploy your application in standalone weblogic server you should setup Repository Creation Utility (RCU). You can download it from
here
RCU will create a new schema in your database which hold all the changes.

10. Unzip RCU downloaded file and go to rcuHome --> BIN and run rcu.bat.


Press Next


Select Create then Press Next


Enter Database connection with sysdba username and password then press next

If any error message appear press ignore


Press OK


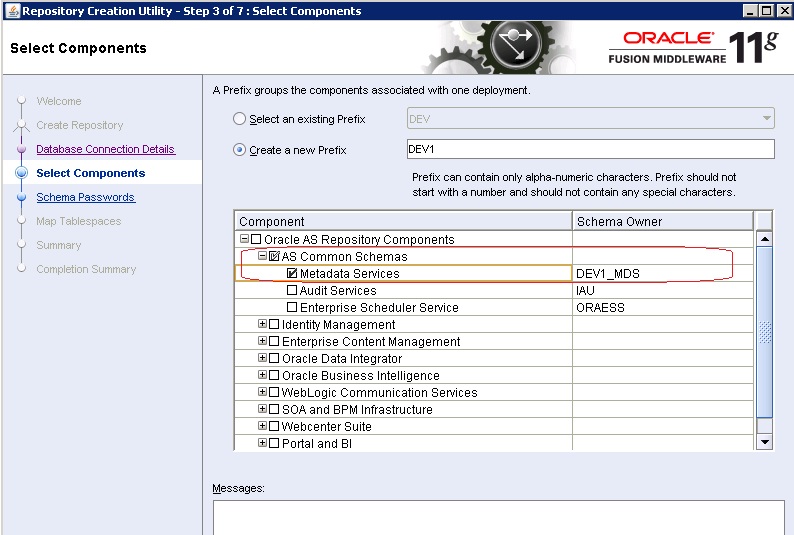
Select Metadata Services Then Press Next


Press OK


Enter the password for the newly created User in database then press Next. Then follow all other steps until Finish

11. After finishing installation of RCU you should configure you weblogic domain to the MDS Repository.

12. Open your weblogic Enterprise manager using URl like
http://yourServerIP:7001/em

13. Enter weblogic username and password

14. Right click in you Weblogic domain the choose "Metadata Repositories"


15. Press Register Button and Enter Database Connection then Press Query


You will find your repository information press on your repository and enter Repository Name and Schema Password Then Press OK.

16. Now you register your MDS to Your Weblogic Domain.


You can select it and choose the target.


17. Weblogic automatic create a data source for connecting to your MDS Repository. If you go to Weblogic Console (http://yourServerIp:7001/console) and go to Services --> Data Sources you will find a newly Data Source


18. Deploy your application directly from JDeveloper to your weblogic server the MDS Deployment Configuration will automatically opened with the configurations of your MDS Repository you should only enter the Position Name.

Thursday, December 2, 2010

Calling SQL Statment Inside Java Code

One of the important way for developing is calling a sql statment inside your java code and I will explain how to do this:
1- call a select statment
asume we want to make a function take department Id and return its name so we will make this function


2- Call an updatable statment as (Create, Insert, Update and Delete)asume we want to make a function take department id and delete it


where getAm() is a method return your Application Module as :


If you want to use java connection (don't want to use AppModule) you can use something like this:


Monday, July 26, 2010

Call Oracle Reports From Your ADF Application

One of the main issues that can face oracle ADF Developers is calling oracle reports.
This post will illustrate step by step how to call oracle reports.

1- Create new ADF Application and make new .jspx page (this page will be a parameter page which will send the parameters to the report).

2- Insert inside page inputTexts which will hold the parameters and insert one commandButton which will run the report.


3- Bind the command button to the method in backbean and write this code:
OracleReportBean reportBean =
new OracleReportBean("oracleServerId", "Port", null);
reportBean.setReportServerParam(OracleReportBean.RS_PARAM_DESTYPE,"DisplayType");// which will be one of the [cashe - file - mail - printer]
reportBean.setReportServerParam(OracleReportBean.RS_PARAM_DESFORMAT,"Format"); // Which will be onr of the [HTML - HTML CSS - PDF - SPREADSHEET- RTF].
reportBean.setReportParameter(parameterName1, parameterValue1);// as report name
reportBean.setReportParameter(parameterName2, parameterValue2);
reportBean.setReportParameter(parameterName3, parameterValue3);
String url = reportBean.getReportServerURL();
reportBean.openUrlInNewWindow(url);
as in picture

4- Make a new java file which will be OracleReportBean (assume its name will be OracleReportBean.java) and write this code inside OracleReportBean.java:

import java.util.HashMap;
import java.util.Iterator;

import javax.faces.context.FacesContext;

import org.apache.myfaces.trinidad.render.ExtendedRenderKitService;
import org.apache.myfaces.trinidad.util.Service;


/***
* This bean performs the following functions:
* Constructing the Report URL with various parameters passed in by client.
* Sending the report request.
* Execute printed report and retrieve return status in the indicated format.
* Execute a binary report (PDF, RTF, XML, with DESTYPE CACHE) and return the
* InputStream for processing.
*/
public class OracleReportBean {

/* Report Servlet Host Settings */
private String http_host = null;
private String http_port = null;

/* Default path as per generic Oracle Appserver install */
private String servlet_path = "/reports/rwservlet";

/* Report Servlet URL params */
public static final String RS_PARAM_SERVER = "server";
public static final String RS_PARAM_USERID = "userid";
public static final String RS_PARAM_REPORT = "report";
public static final String RS_PARAM_ENVID = "envid";
public static final String RS_PARAM_DESTYPE = "destype";
public static final String RS_PARAM_DESFORMAT = "desformat";
public static final String RS_PARAM_STATUSFORMAT = "statusformat";
public static final String RS_PARAM_DESNAME = "desname";
public static final String RS_PARAM_PAGESTREAM = "pagestream";
public static final String RS_PARAM_DELIMITER = "delimiter";
public static final String RS_PARAM_ORIENTATION = "orientation";
public static final String RS_PARAM_DISTRIBUTE = "distribute";
public static final String RS_PARAM_FILETYPE = "FILETYPE";
public static final String RS_PARAM_REP_VA = "REP_VA";


private String value_keyMap = null;

/* Static values for destination formats */
public static final String DESFORMAT_PDF = "PDF";
public static final String DESFORMAT_HTML = "HTML";
public static final String DESFORMAT_POSTSCRIPT = "POSTSCRIPT";
public static final String DESFORMAT_DELIMITED = "DELIMITED";
public static final String DESFORMAT_XML = "XML";
public static final String DESFORMAT_RTF = "RTF";

/* Static values for destination types*/
public static final String DESTYPE_MAIL = "mail";
public static final String DESTYPE_PRINTER = "printer";
public static final String DESTYPE_FILE = "file";
public static final String DESTYPE_LOCAL_FILE = "localFile";
public static final String DESTYPE_CACHE = "cache";

/* Static values for distribute */
public static final String DISTRIBUTE_YES = "YES";
public static final String DISTRIBUTE_NO = "NO";

/*Static values for status format */
public static final String STATUSFORMAT_XML = "XML";
public static final String STATUSFORMAT_HTML = "HTML";

/* Static values for report orientation */
public static final String ORIENTATION_PORTRAIT = "PORTRAIT";
public static final String ORIENTATION_LANDSCAPE = "LANDSCAPE";
public static final String ORIENTATION_DEFAULT = "DEFAULT";

/* HashMap to hold individual report parameters*/
private HashMap reportParams = new HashMap();

/* HashMap to hold report server params */
private HashMap reportServerParams = new HashMap();

/* Report Servlet */
private StringBuffer reportURL = new StringBuffer();
// private String XMLReturnStatus = null;


/***
* Constructor
*/
public OracleReportBean(String p_http_host, String p_http_port,
String p_servlet_path) {
http_host = p_http_host;
http_port = p_http_port;

/* If the servlet path is null, we assign the default path. */
if (p_servlet_path != null) {
servlet_path = p_servlet_path;
}

/* Default the status format to XML
setReportServerParam(RS_PARAM_STATUSFORMAT,STATUSFORMAT_XML);*/

}


/*****
* Private utility methods ...
*
*/
private String buildKeyValueString(HashMap p_map) {

String map_key = null;
String param_sep = "&";
String param_equal = "=";
StringBuffer keyValueBuffer = new StringBuffer();

if (!p_map.isEmpty()) {

Iterator mapKeys = p_map.keySet().iterator();

while (mapKeys.hasNext()) {
map_key = (String)mapKeys.next();
keyValueBuffer.append(map_key).append(param_equal).append(p_map.get(map_key));

if (mapKeys.hasNext()) {
keyValueBuffer.append(param_sep);
}
}
}
return keyValueBuffer.toString();
}

/* Construct the URL for accessing the Oracle Reports Servlet */

private void constructURL() {
String param_sep = "&";

/* Clearout current URL */
reportURL = new StringBuffer();

/* HOST Section */

reportURL.append("http://");
reportURL.append(http_host);

if (http_port != null) {
reportURL.append(":").append(http_port);
}

/* Add "/" separator if necessary. */
if (servlet_path.indexOf("/") > 0) {
reportURL.append("/");
}

reportURL.append(servlet_path);
reportURL.append("?");

if (value_keyMap != null) {
reportURL.append(value_keyMap).append(param_sep);
}

/*Construct Report Server Parameter URL component*/
reportURL.append(buildKeyValueString(reportServerParams));

if (!reportServerParams.isEmpty()) {
reportURL.append(param_sep);
}

/*Construct Report Parameters URL Component*/
reportURL.append(buildKeyValueString(reportParams));
}

/***
* Getters and Setters for the Reports Servlet
* URL parameter values.
*/

public void setReportServerParam(String p_param, String p_value) {
reportServerParams.put(p_param, p_value);
}

public String getReportServerParam(String p_param) {
if (reportServerParams.containsKey(p_param)) {
return (String)reportServerParams.get(p_param);
} else {
return null;
}
}

/* Set/Get the value of a Reports KeyMap file */

public void setKeyMap(String p_keyMap) {
value_keyMap = p_keyMap;
}

public String getKeyMap() {
return value_keyMap;
}

/* Add/Update and retrieve individual report parameters */

public void setReportParameter(String paramName, String paramValue) {

reportParams.put(paramName, paramValue);
}

public String getReportParameter(String paramName) {

if (reportParams.containsKey(paramName)) {
return (String)reportParams.get(paramName);
} else {
return null;
}

}

/****
* Construct and return a URL that can be used to execute the report.
*/
public String getReportServerURL() {
constructURL();
return reportURL.toString();
}

public void openUrlInNewWindow(String url) {
ExtendedRenderKitService erks =
Service.getRenderKitService(FacesContext.getCurrentInstance(),
ExtendedRenderKitService.class);
StringBuilder strb = new StringBuilder("window.open('" + url + "');");
erks.addScript(FacesContext.getCurrentInstance(), strb.toString());
}
}


Oracle Report URL should be at this format
http://myServer:myport/reports/rwservlet?destype=cache&desformat=PDF&report=myreport.jsp&myparameter=myvalue

5- Save and Run the application.

You can see other way to call oracle report from this link
http://sameh-nassar.blogspot.com/2012/05/call-oracle-reports-from-your-adf.html

Tuesday, May 4, 2010

Execute Code When Enter Or Exit Any Pages In Your Application

In some application developer need to execute some code at page load or need to execute some code when leave the page. If the developer need to execute the same code to many of pages in the application at page load (as sharing code will executed when any of the application page load) he need to follow this steps:

1- In your ADF Application Make a new Managed-Bean (assume its name is PageListenerBean).

2- Write this code in the Managed bean

import javax.el.ELContext;
import javax.el.ExpressionFactory;
import javax.el.ValueExpression;

import javax.faces.application.Application;
import javax.faces.context.FacesContext;

import oracle.adf.controller.v2.lifecycle.Lifecycle;

import oracle.adf.controller.v2.lifecycle.PagePhaseEvent;
import oracle.adf.controller.v2.lifecycle.PagePhaseListener;

public class PageListenerBean implements PagePhaseListener{
public PageListenerBean() {
}

public void afterPhase(PagePhaseEvent pagePhaseEvent) {
}

public void beforePhase(PagePhaseEvent pagePhaseEvent) {
if (pagePhaseEvent.getPhaseId() == Lifecycle.PREPARE_MODEL_ID) {
if (!isPostback()){
System.out.println("This Will Execute AT Page Load");
}
}

if (pagePhaseEvent.getPhaseId() == Lifecycle.METADATA_COMMIT_ID) {
if (!isPostback()){
System.out.println("This Will Execute When Leave The Page");
}
}

}
private boolean isPostback() {
return Boolean.TRUE.equals(resolveExpression("#{adfFacesContext.postback}"));
}
private Object resolveExpression(String expression) {
FacesContext facesContext = FacesContext.getCurrentInstance();
Application app = facesContext.getApplication();
ExpressionFactory elFactory = app.getExpressionFactory();
ELContext elContext = facesContext.getELContext();
ValueExpression valueExp =
elFactory.createValueExpression(elContext, expression,
Object.class);
return valueExp.getValue(elContext);
}
}


3- For every page in your application you want to execute this code at page load or when you leave the page ---> Right click on your jspx page and go to your page definition. Set the attribute ControllerClass inside your pageDefinition tag as the name of the managed bean.


4- Run your page to check the results.

Sunday, April 4, 2010

Main References To Learn Oracle ADF

Oracle ADF is a new technology and many people want to learn this and they want to know the main references to learn this technology. Many of them ask a question "How can I start to learn Oracle ADF?" This post will help them and take their hand to learn this technology.
You should at least know Java (J2SE) and it will be better to set with anyone (good in ADF) to explain the basic of ADF to you or take any course for ADF first because if you start from scratch it will be difficult for you to understand ADF.

I prefer, initially you can take a course for ADF, this course will open the door for your mind to go ahead and learn ADF by your self.

I have created a course in Udemy for anyone like to learn ADF. I covered almost all ADF life cycle and at end of the course I create a complete ADF application to show you how you can develop a complete ADF application. By end of this course you should be able to create a complete ADF application by yourself.

ADF can be the first step to Oracle Fusion Middleware world.

This is the course URL

https://www.udemy.com/oracle-adf-12c-for-beginner-step-by-step/


The main references are:

1- JDeveloper home in oracle web site

http://www.oracle.com/technetwork/developer-tools/jdev/overview/jdeveloper-reviewrguide-086026.html

in this site you will find this sections:

- "Overview" this section will explain the overview of some topics as JDeveloper , ADF ... and I prefered for any one does not know anything about JDveloper and ADF read this section first.

- "Getting Started - tutorials" this section will be useful for who want to learn oracle ADF

In this site you can download last version of JDeveloper, you can read the JDeveloper news, you can enter to the JDeveloper & ADF forum and read the blogs.

2- Developer’s Guide
Developer’s Guide is a PDFs file:

1- Web User Interface Developer’s Guide.
2- Fusion Developer's Guide for Model layer.
3- Desktop Integration Developer's Guide.
4- Mobile Browser Client Developer's Guide.
5- Administrator's Developer's Guide.

for learning Oracle ADF you can read Web User Interface Developer’s Guide and Fusion Developer's Guide for Model layer only.

You can download (Web User Interface Developer’s Guide) from here
You can download (Fusion Developer's Guide for Model layer) from here
You can download one pdf hold both View and Model (Oracle Jdeveloper 11g Handbook) from here

or You can find them in Oracle JDeveloper Documentation from

http://docs.oracle.com/cd/E37975_01/index.htm

3- JDeveloper and ADF forum
http://forums.oracle.com/forums/forum.jspa?forumID=83

In this forum you can ask any question or answer any asked question (but first you should have an account in oracle web site).

4- JDeveloper & ADF Blogs
- http://wiki.oracle.com/page/ADF+Blogs

This blogs one of the main references to learn oracle ADF which has a solution or a work around for any issue in ADF.

This is some of the great blogs:

1- http://sameh-nassar.blogspot.com/ :)
2- http://andrejusb-samples.blogspot.com/
3- http://andrejusb.blogspot.com/
4- http://blogs.oracle.com/shay/
5- http://frank.thepeninsulasedge.com/
6- http://www.awasthiashish.com/


This is a 4 main reference that I depending on it for learning oracle ADF.

Hint : Anyone can find another reference please tell me to add it in this post.

Wednesday, February 24, 2010

JavaScript With ADF Faces Samples

In your ADF web application you may want to use javaScript functions to perform some actions in client side. I will list some of the major javaScript functions which I use it in my applications. To use javaScript functions in your ADF Application (In JDeveloper 11.1.1.2.0) you should do the following :

1- Put inside af:document --> af:resource component with type javaScript (prefer to put the af:resource component inside metaContainer facet of af:document).

2- use af:clientListener component to call the function.

some of the JavaScript sample :

- Open popup
function openPopup(evt){
var popup = AdfPage.PAGE.findComponent("popupId");
popup.show();
}

- Hide poup
function aboutOkButton(event) {
var dialog = event.getSource();
var popup = dialog.findComponent("aboutPopup");
popup.hide();
event.cancel();
}

- Change component visibility
function showText()
{
var output1 = AdfUIComponent.findComponent("output1")
var output2 = AdfUIComponent.findComponent("output2")
var input = AdfUIComponent.findComponent("input")

if (input.value == "")
{
output1.setVisible(true);
}
else
{
output2.setVisible(true)
}

}

- Read value from inputText
var input1 = document.getElementById('in1::content');
var input2 = document.getElementById('in2::content');

if (input1.value == input2.value)
{
alert("Equals");
}
else
{
alert("No Equals");
}

- Set Panel Splitter Position
function setSplitterPos(event) {
var source = event.getSource()
source.setSplitterPosition(200);
}

insert inside af:panelSplitter ---> af:clientListener as:
< af:clientListener method="setSplitterPos" type="propertyChange"/ >

- Execute af:commandButton action

var component = AdfPage.PAGE.findComponentByAbsoluteId(commanButtonId);
AdfActionEvent.queue(component, component.getPartialSubmit());

- Execute goButton

function invokeGo(event){
var component = AdfPage.PAGE.findComponentByAbsoluteId("gb1");
var redirectEvent = new AdfRedirectEvent(component, component.getDestination(), true);
redirectEvent.queue(true);
}

Hint :
AdfRedirectEvent is an internal class and the target is not recognized. Note that on the goButton, you need to set the clientComponent property to true.

- Run file.exe
function RunExe()
{
var commandtoRun = "C:\\file.exe";
var objShell = new ActiveXObject("Shell.Application");
objShell.ShellExecute(commandtoRun, "", "", "open", 1);
}

- Accepting only Upper Case characters in input field

/// For IE only

function convertToUpperCase( _event ) {
var currText = null;
currText = String.fromCharCode(window.event.keyCode);
window.event.keyCode = currText.toUpperCase().charCodeAt(0);
}

/// For Mozilla

function convertToUpperCase( _event ) {
var _keycode = _event.getKeyCode();
if( ( _keycode > 64 && _keycode < 90 ) ||

( _keycode > 96 && _keycode < 123 ) ) {

currText = String.fromCharCode(_event.getKeyCode());
currText = currText.toUpperCase();

var _textFieldField = document.getElementById ( _event.getSource().getClientId() );
var _inputFields = _textFieldField.getElementsByTagName('INPUT');
var _firstInputField = _inputFields[0];
_firstInputField.value = String.concat( _firstInputField.value, currText);
_event.cancel();
}
}

- To know which browser you use

function iEOrNot(myEvent) {
var currText = null;
if(!myEvent)
myEvent = window.event;
if(navigator.appName == 'Microsoft Internet Explorer') {
// I am IE
} else if(navigator.appName != 'Microsoft Internet Explorer') {
// I am not IE
}
}

- Get screen width and hight

width = java.awt.Toolkit.getDefaultToolkit().getScreenSize().width;

hight= java.awt.Toolkit.getDefaultToolkit().getScreenSize().hight;

- Get Mac Address, Ip Address and Computer Name
function call(event) {
var source = event.getSource();
var macAddress = "";
var ipAddress = "";
var computerName = "";
var wmi = GetObject("winmgmts:{impersonationLevel=impersonate}");
e = new Enumerator(wmi.InstancesOf("Win32_NetworkAdapterConfiguration"));
for(; !e.atEnd(); e.moveNext()) {

var s = e.item();
if(s.DNSHostName!=null)
{
macAddress = s.MACAddress;
ipAddress = s.IPAddress(0);
computerName = s.DNSHostName;
}
}
}

- Open inputDate calender

function openDate(event) {
src = event.getSource();
popup = src.findComponent(""+AdfRichUIPeer.CreateSubId(src.getClientId(), AdfDhtmlInputDatePeer._POPUP_ID));
hints = {alignId:src.getClientId(), align:AdfRichPopup.ALIGN_END_AFTER};
popup.show(hints);
}

- Get keyCode of the key
function keyCode(evt) {
var k=evt.getKeyCode();
}

- Set cursor to inputText
function setFocus(evt) {
var t=document.getElementById('t1::content');// t1 is the inputText Id
t.focus();
}

- Change panelGroupLayout layout property


Sunday, January 10, 2010

Create PL/SQL Function And Call It From Your ADF Application

In many situations you need to create PL/SQL function in your database and call it from your application. This post will illustrate how to create PL/SQL function in your database and how to call this function. The next example will be applied in HR Schema which we will create a PL function that take an employee Id and return his name. Follow these steps:
1- Create new ADF Application assume Application name "UsingPLSQLFunction_Application".
2- Create new page assume its name "index.jspx".
3- Your Application should like this

4- Right-click in your model project -- > new --> ADF Business Components --> Business Components From Tables. Then Press Ok.
5- Choose you database connection (assume HR Schema).
6-Choose EMPLOYEES Table as an Entity. Then Choose Employees as Updatable view object. Then press in finish button.
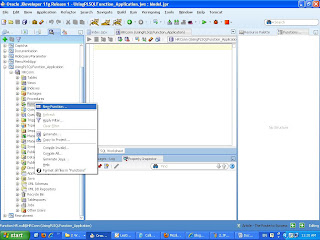
7- Open your database navigator then open your application connection then right-click on Function then choose New Function.

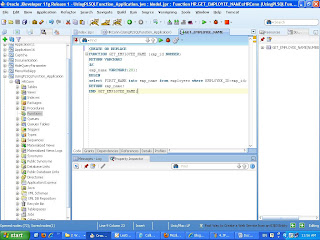
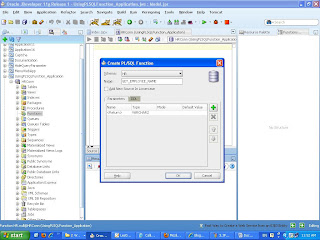
8- Enter Function Name as "GET_EMPLOYEE_NAME" then press ok. 9- Write this function :
CREATE OR REPLACE FUNCTION GET_EMPLOYEE_NAME (emp_id NUMBER)

RETURN VARCHAR2

AS

emp_name VARCHAR2(20);

BEGIN

select FIRST_NAME into emp_name from employees

where EMPLOYEE_ID=emp_id;

RETURN emp_name;

END GET_EMPLOYEE_NAME;

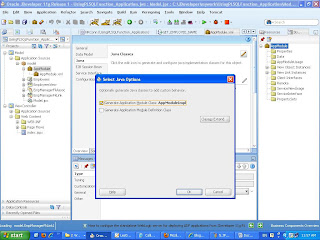
10 - Open your Application Module and generate AppModuleImpl file. 11- Open this file and write this function
imports:
import java.sql.CallableStatement;
import java.sql.SQLException;import java.sql.Types;
import oracle.jbo.JboException;

public String getEmployeeName(int empId){

CallableStatement cs=null;

try{

cs=getDBTransaction().createCallableStatement("begin ? := GET_EMPLOYEE_NAME(?); end;",0);

cs.registerOutParameter(1, Types.VARCHAR);

cs.setInt(2, empId);

cs.executeUpdate();

return cs.getString(1);

}catch(SQLException e){

throw new JboException(e);

}

}

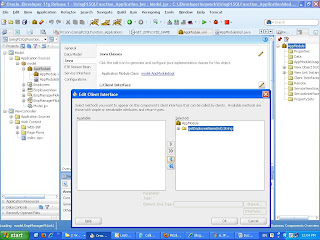
12- Open AppModule -- > java --> client Interface then shuttle this function.

13- From your Data Control drag your function in the page then choose ADF Parameter Form.
14- Right-click in the generated button then choose "Create Method Binding For Action" then create a manged bean.
15- The commandButton Method will be like this
public String cb1_action() {
BindingContainer bindings = getBindings();
OperationBinding operationBinding = bindings.getOperationBinding("getEmployeeName");
Object result = operationBinding.execute();
System.out.println("Result= " + result); // result will be the output of PL function
if (!operationBinding.getErrors().isEmpty()) {
return null;
}
return null;
}
16- Save your Application then run index.jspx.

Sunday, December 13, 2009

Use Checkbox For Selecting Multiple Rows From af:table

One of the feature which existed in JDeveloper 10g but not found in JDeveloper 11g is using checkbox for selecting multiple rows from af:table.
This is my workaround for achieving this feature in JDeveloper 11g. Follow this steps:

1- Make a new ADF fusion web Application.
2- choose your database connection. (assume we are using HR Schema)
3- Make one viewObject based on entity (assume Employees viewObject based on Employees Entity)
4- Open your Employees ViewObject and make a new transient attribute with type boolean and make it always updatable (assume the transient Attribute name is 'TransientAttr').


5- Make a new page and drag your employee view as a table and don't check on Row Selection checkbox.
6- In your Structure Palette goto your inputText Transient attribute and right click and choose Convert to.


7- From opening dialog choose Select Boolean Checkbox ---> Ok ----> Ok.

8- Make the selectBooleanCheckbox component AutoSubmit with true and put its Id in the table partialTrigger and clear its lable and text.
9-
Select all columns and goto Style Property and inlineStyle write
this #{(row.TransientAttr)?"background-color: #ffaaaa":""};
where #ffaaaaa is the color of the selected row (you can change this color as you want).
10-Now any row has its transient Attribute with true value, this row will be selected row.