Monday, April 25, 2016

Setup Standalone Weblogic 12.2.1 (Step-by-Step)

In this post I will show you how to setup weblogic 12c in production environment. We will go throw all these points:

  • Sources required
  • Setup JDK 8
  • Setup weblogic 12.2.1
  • Setup FMW Infrastructure (ADF Runtime)
  • Create Repository Configuration Utility (RCU)
  • Create Weblogic Domain
  • Run and Configure the domain

1. Sources Required


1.       JDK 8
2.       Weblogic 12.2.1.0.0
3.       FMW Infrastructure (ADF Runtime)


2. Setup JDK 8

Double click on the jdk .exe file and setup jdk on the path has no space as


Do the same in JRE as


3. Setup Weblogic 12.2.1

-          Open cmd and write this:
/bin/java.exe –D64 –jar
For example:
C:\Java\jdk1.8.0_74\bin\java.exe –D64 –jar C:\12c_sources\fmw_12.2.1.0.0_wls.jar


-          Follow the following screen shots to setup Weblogic 12c


4. Setup FMW Infrastructure

-          Open cmd and write this:
/bin/java.exe –jar
For example:
C:\Java\jdk1.8.0_74\bin\java.exe –jar C:\12c_sources\fmw_12.2.1.0.0_infrastructure.jar


-          Setup infrastructure on the created Middleware folder as shown on these screenshots


5. Create Repository Configuration Utility (RCU)


-          You should know database connection information with sys user before start setup RCU.
-          Open cmd and run “rcu.bat” located on this path (/oracle_common/bin)
For example:
C:\Oracle\Middleware12.2.1\oracle_common\bin\rcu.bat


-          Follow these screenshots to setup RCU


These schema owner will be used when you create weblogic domain.


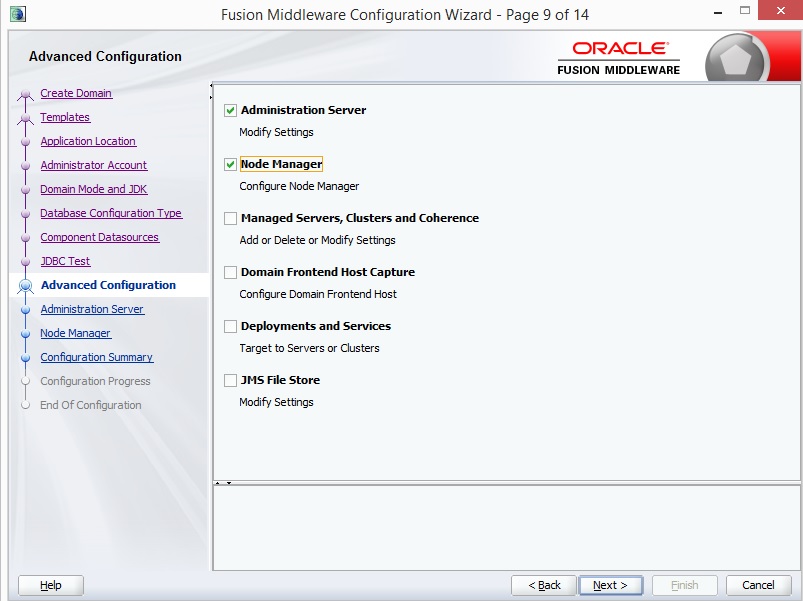
·         6. Create Weblogic Domain

-          Open cmd and run \wlserver\common\bin\config.cmd
For example:
C:\Oracle\Middleware12.2.1\wlserver\common\bin\config.cmd


-          Follow these screenshots to create the domain:


  7. Run and Configure the domain


-          Run this command to run AdminServer \ user_projects\domains\\bin\startWebLogic.cmd
For example:
C:\Oracle\Middleware12.2.1\user_projects\domains\ADFDomain\bin\startWebLogic.cmd


-          After successfully running the AdminServer open the browser and open the console from this url http://serverIp:port/console
For example:
 http://weblogic12:7001/console

-          From the console create a ManagedServer and after creating the managed server the JRF libraries automatically will applied to the server so no need to go to em to apply JRFTemplate anymore


-          Create a Machine and add AdminServer and ManagedServer to this machine


-          Install Node Manager services by invoking \user_projects\domains\\bin\installNodeMgrSvc.cmd
For example:
C:\Oracle\Middleware12.2.1\user_projects\domains\ADFDomain\bin\installNodeMgrSvc.cmd
-          You can configure node manager from nodemanager.properties file. You can find this file in this path:
\user_projects\domains\\nodemanager
For example:
C:\Oracle\Middleware12.2.1\user_projects\domains\ADFDomain\nodemanager

Note: if you make any changes in nodemanager.properties file you have to restart node manager services.

-          Shutdown AdminServer and ManagedServer.
-          To increase the ManagedServer memory, you can open setStartupEnv.cmd file from this path:
\user_projects\domains\\bin\
For example:
C:\Oracle\Middleware12.2.1\user_projects\domains\ADFDomain\bin\
In the section if "%STARTUP_GROUP%"=="“ you can configure memory as


-          Run AdminServer and ManagedServer using node manager as:

Ø  Run wlst.cmd from \wlserver\common\bin\wlst.cmd


Ø  Connect to node manager using this command
nmConnect('weblogic','','','','','','ssl')

For example:

nmConnect('weblogic','weblogic1','localhost','5556','ADFDomain',' C:\Oracle\Middleware12.2.1\user_projects\domains\ADFDomain ','ssl')


Ø  Start AdminServer using this command:
nmStart('AdminServer')

Ø  Start ManagedServer using this command:
nmStart('') as
nmStart('ADFServer')


You can download a word document file (.docx) from here


Tuesday, February 2, 2016

Change Web Service WSDL at Runtime When Calling SOAP Web Service (Step-by-Step)

Sometime we need to change the Web Service WSDL URL dynamically at runtime when we call web service. The Web Service may deployed in different environments and you want depending on some conditions you will decide which version you should call.
In this example I will show you how to call SOAP Web Service progrmatically with dynamic wsdl url.

I used JDev 11.1.2.4.0 for developing this complete example.

1- Create a Simple Web Service:

I will create a simple web service has one function call "sayHello" this function will receive String and will return "Hello " + String.

- From JDeveloper create a custom application "e.g SimpleWebService" with one project "e.g SimpleWS" then create a class "e.g MyWebService.java" has one function sayHello as shown


- Right click on the MyWebService.java --> Create Web Service


- Go throw the opened wizard to create the web service. After finish creating the web service the application should be like:


- Right click on the MyWebService.java --> Test Web Service


Now the web service is running in my local machine with wsdl url

http://localhost:7101/SimpleWebService-SimpleWS-context-root/MyWebServicePort?wsdl

I will deploy it in another server and the web service wsdl url will be

http://weblogic2:8000/SimpleWebService-SimpleWS-context-root/MyWebServicePort?wsdl

- Now we finished creating Web Service and deployed it in 2 different environments with 2 different wsdl url.


2- Create a jar File for Calling The Web Service

To call this web service in other applications like ADF application or Java Application you should create jar file and use this jar file on this application.

- Create dummy application --> right click on the project --> New --> Web Service Client and Proxy


- Enter any of the Web Service wsdl url (I will enter the local running web service wsdl url) then press Finish


- The client class will open with code in case you want to test WS


- To create the jar file, right click on the project --> Deploy -->MyWebService-Client


- We will use the generated jar file on other application which will call this WS like ADF Application or any Java application

3- Call the The Web Service Programmatically With Dynamic WSDL URL

- Create new custom application "e.g. CallWebServiceDynamically" with java class "e.g. CallWS.java"


- Import jar file (which we created in the previous point) in the project


- Inside CallWS class write main method with this code


I will describe this code line by line:

     QName qname = new QName("http://simplews/", "MyWebService");

QName will receive 2 parameters you can get these 2 parameters by running the Web Service WSDL in any browser and take the value of targetNamespace and name


URL wsdl1 = new URL("http://localhost:7101/SimpleWebService-SimpleWS-context-root/MyWebServicePort?wsdl");

In this line you write the desired web service WSDL URL

 MyWebService_Service myWebService_Service = new MyWebService_Service(wsdl1, qname);
 MyWebService myWebService = myWebService_Service.getMyWebServicePort();

These 2 lines you can get it from the dummy application client class (which generated when we try to generate jar file in the previous step)

But the first line is bit different because it will accept the wsdl url and gname


System.out.println("Web Service Output= " + myWebService.sayHello("Sameh"));

This is line for testing the Web Service and print the output on the log.

- To run the test application Right click on the CallWS --> run
You will find the web service output on the log


- Try to change the wsdl to point to the second deployed web service and run again


You can download the sample examples from here


Friday, January 22, 2016

Open ADF Popup on The Top of The Screen

In ADF if you open a popup, by default this popup will open in the center of the screen. Some customers want to open the popup in the top of the screen, in this case you can choose one component in the top and use align id hints before opening the popup but I see this way is not good because you may not find a suitable component for alignment.

In this post I will show you how to use javascript function to put the popup in the top of the screen. In java function we will get the screen height and we will set the popup dialog margin by screen height divided by 2.

Just call this function before opening the popup (may be in the popup fetch listener)


Send the dialog id to this function and the dialog will be in the top of the screen.

If dialog id ="id1" and you use page template with id ="pt1" so you should send "pt1:d1" to the function.


Wednesday, December 30, 2015

Apply Dynamic JDBC in ADF Application (Step-by-Step)

In some situations the business require that ADF application can connect to different database users depending on the login user. For example if user1 login, the ADF application will connect to database user hr/hr. If user2 login, the ADF application will connect to database user hr2/hr2.
This is call Dynamic JDBC.

In this url you can see how to apply this dynamic JDBC, but in my post I will simplify this url by creating a sample ADF application and go step by step for how to apply dynamic JDBC to this ADF application.

I use JDeveloper 11.1.2.4.0.

Note: From Step1 to Step5 it just steps for creating a simple ADF application. Applying the Dynamic JDBC to this simple application is starting from Step6.

Step1:
Create a simple ADF Application connect to "hr" database, this application will contains only 1 ViewObject (Employees) and will contains 2 jspx pages (login.jspx and emp.jspx)


Step2:
From faces-config.xml --> Navigation Rules define outcome to the two jspx pages.
login.jspx---> login
emp.jspx----> emp


Step3:
- In the login.jspx page add two inputTexts (Username and Password) and one command button for login.
- Bind Username inputText and Password inputText to the back bean.
- Create action for the login command button to read the username and password then navigate to emp.jspx page.


Step4:
In the emp.jspx drag EmployeesView1 to the page and add logout link to the page 


The back bean should be:


Step5:
Run login.jspx page.

Now we have created a simple ADF application and we will now apply dynamic jdbc to this application.

Step6:
Open AppModule and set "Connection Type" to JDBC URL for both AppModuleShared and AppModuleLocal


Step7:
In the login button action we will store username/password it in session.
The login button action will be:


Step8:
Create new Filter (DynamicJDBCBindingFilter.java) extends ADFBindingFilter.


Step9:
Create Class (DynamicJDBCEnvInfoProvider) as


Step10:
Create Class (DynamicJDBCHttpSessionCookieImpl) as


Step11: 
Create Class (DynamicJDBCSessionCookieFactory) as


Step12:
In web.xml update adfBindings and make it point to DynamicJDBCBindingFilter


then add filter mapping to adfBindings filter


Step13:
In AppModule update jbo.ampool.sessioncookiefactoryclass in AppModuleLocal and AppModuleShare to point to DynamicJDBCSessionCookieFactory


Step14:

Now run login.jspx and login with database username/password = hr/hr you will successfully login and  get the data


Logout then login again with wrong password as hr/hr1 you will get "Invalid username/password".


You can download the sample application from here


Tuesday, December 29, 2015

Get JDeveloper and ADF Icons and Styles

Some developers want to get some icons which used in ADF components or JDeveloper. Examples of these icons (edit icon, LOV icon, undo icon,...) or get some css files which used for styling.

You can find these icons and css files on the jar file adf-richclient-impl-11.jar

You can find this jar in the path like:

C:\Oracle\Middleware\oracle_common\modules\oracle.adf.view_11.1.1\adf-richclient-impl-11.jar


You can extract this jar file then open "adf" folder and you will find 2 folders:

1-  "images" this folder will store icons.
2- "styles" this folder will store css files.


Friday, December 11, 2015

ADF Table Filter Case Insensitive and Search by Contains Instead of Start With

In ADF table if you enable column filter this filter by default will search by "start with" and it will be case sensitive . For example in table employees if you have employee name = Hermann and you try to search by "man", the search will return no result


but if you search by "Herm" it will return result


If you try to search by "herm" it will return no result.


This is because the filter by default is case sensitive and will search by start with.

In many cases we need the all tables filters be case insensitive and search by contains not start with. You can search by case insensitive by setting filterFeatures="caseInsensitive" for  each af:column but you need to do this in all af:column in your application and it will not be a proper solution.

You can search with contains by typing your string between '%', but we need something to be more easy than typing %.

To make the the ADF table filter be case insensitive and search by contains follow these steps:

1- In model project create new class "CustomViewImpl" this class should extend oracle.jbo.server.ViewObjectImpl


2- In this class override getCriteriaItemClause(ViewCriteriaItem viewCriteriaItem) and write this code:


3- Go to Model --> Project Properties --> ADF Business Components --> Base Classes --> View Object --> change Object to point to your CustomViewImpl class


4- Open ViewObject --> Java --> Java Classes --> Generate View Object Class


5- If you open the generated ViewImpl class you will find it extend the CustomViewImpl class


6- Run the application and test.

You can download the sample application from here

(This sample developed in JDev 11.1.2.4.0)