Tuesday, October 9, 2018

Secure Your SOAP Web Service Using username Token Security

Some developers asked me how can they add security to their web services, so in this post I will show you how you can develop SOAP web service and secure the web service using username token security.

I use JDeveloper 11g (11.1.1.7.0) and I use SOAPUI to test my web service.

First Step: Develop SOAP Web service


  • Open JDeveloper and create new Application

  • Create a class which will be your web service (e.g MyWebService)


  • Write your web service. In this example I will create simple web service with one function call sayHello, this function will receive as a parameter and return Hello, , as shown:


  • To convert the java class to web service, right click on the class --> Create web service


  • Follow these screenshots then press Finish:


  • Your web service will looks like this:

  • To add the security, in WEB-INF create folder call "policies" and inside this folder create an xml file call "usernametoken.xml".
  • Inside this usernametoken.xml write as shown (you can download the Sample Application and take this file)


  • In your webservice, point to this usernametoken.xml file by writing "@Policies({ @Policy(uri = "policy:usernametoken.xml") })" under "@WebService" as shown:

  • Save all and run your webservice.

  • After your webservice is running, just open the browser and run web service WSDL, the usernametoken secuirty should appear in the wsdl as shown:


Second Step: Test SOAP Web service using SoapUI

  • Open SoapUI and create new SOAP Project.

  • Enter any project name and enter your web service WSDL.


  • Open the Webservice request and try to enter any value in the parameter and run to test webserivce. You will get security error message as shown:


  • You get error message because we didn't enter username/password to invoke the webservice. Let us first add the user which we will use to test WS. In weblogic server which the webservice is running, you can open weblogic console --> Secuirty Realms --> myrealm --> Users and Groups


  • You can add any user and set the password (I will use weblogic user to test the WS)


  • Back to SoapUI, and we should set username and password to invoke WS. Right click on the Soap Project --> Show Project View


  • In WS-Secuirty Configurations --> Outgoing WS-Secuirty Configurations --> press on Add button


  • Enter any name

  • In the left bottom section add new WSS entry

  • From drop down list select type "Username"

  • Enter Username and Password (the user which you defined in weblogic) and select PasswordText as shown


  • In the soap request close it and reopen it again. In the bottom of the request select Auth and select Add New Authentication

  • Select Type --> Basic

  • Select the created Outgoing WSS  as shown


  • Now invoke the web service again, you will find the result is generated and the webservice is called successfully.


You can download the webservice sample application from this here


Saturday, September 29, 2018

Learn Oracle ADF From Scratch Step-by-Step

I have created a course in Udemy for anyone like to learn ADF. I covered almost all ADF life cycle and at end of the course I create a complete ADF application to show you how you can develop a complete ADF application. By end of this course you should be able to create a complete ADF application by yourself.

ADF can be the first step to Oracle Fusion Middleware world.

This is the course URL

https://www.udemy.com/oracle-adf-12c-for-beginner-step-by-step/

Hopefully you find your goal in this course.

Tuesday, June 19, 2018

Create New ADF Business Component Issue in Jdeveloper 12c

In JDeveloper 12c I will show you one of the issue you may face when you try to create new Entity Object or create ADF Business Components From Table.

For this example I have an ADF application with model project and I want to create one new Entity Object in the model project:

- Right click on the Model Project --> New --> Entity Object


- You will find there is no Database Schema and You can't Browse schema object.


- In the Model project if you check if there is a database connection is defined in ADF Business Components or not, you will find there is a database connection defined.


So where is the problem?

Let us try to create the entity using Business Components From Table


You will find in the third step, there is no schema and you can't shuttle anything and the wizard will stop in this step as shown:


When you have a look on the JDev log, you can find exception like:

SELECT /*OracleDictionaryQueries.ALL_VISIBLE_USERS_QUERY*/
U.USERNAME, 'SCHEMA', NULL OBJECT_ID, NULL LAST_DDL_TIME
FROM SYS.DBA_USERS U
WHERE EXISTS ( SELECT 1
               FROM   SYS.DBA_TAB_PRIVS_RECD TPR
               WHERE  TPR.OWNER = U.USERNAME )
AND U.USERNAME LIKE ?
UNION
SELECT USER, 'SCHEMA', NULL OBJECT_ID, NULL LAST_DDL_TIME FROM SYS.DUAL
oracle.javatools.db.DBSQLException: java.sql.SQLSyntaxErrorException: ORA-00942: table or view does not exist

        at oracle.javatools.db.execute.StatementWrapper.createDBSQLException(StatementWrapper.java:711)
        at oracle.javatools.db.execute.ConnectionWrapper.call(ConnectionWrapper.java:199)
        at oracle.javatools.db.execute.ConnectionWrapper.call(ConnectionWrapper.java:117)
        at oracle.javatools.db.execute.ConnectionWrapper.run(ConnectionWrapper.java:102)
        at oracle.javatools.db.execute.QueryWrapper$QueryExecutionRunnable.runImpl(QueryWrapper.java:459)
        at oracle.javatools.db.execute.StatementWrapper$ExecutionRunnable.run(StatementWrapper.java:920)
        at oracle.ideimpl.db.ProgressBarExecutionWrapper.runAndLog(ProgressBarExecutionWrapper.java:137)
        at oracle.ideimpl.db.ProgressBarExecutionWrapper.access$000(ProgressBarExecutionWrapper.java:37)
        at oracle.ideimpl.db.ProgressBarExecutionWrapper$R.run(ProgressBarExecutionWrapper.java:181)
        at oracle.ide.dialogs.ProgressBar.run(ProgressBar.java:961)
        at java.lang.Thread.run(Thread.java:748)


The reason of this issue come from the database user privileges. To fix this issue follow the following steps:

1- Connect to sys database and grant dba to the database user which you use in ADF application Model.


2- Restart Jdeveloper.

3- Now try to create new Entity or Create Business Component From Table, it should be ok and works fine.


Monday, April 25, 2016

Setup Standalone Weblogic 12.2.1 (Step-by-Step)

In this post I will show you how to setup weblogic 12c in production environment. We will go throw all these points:

  • Sources required
  • Setup JDK 8
  • Setup weblogic 12.2.1
  • Setup FMW Infrastructure (ADF Runtime)
  • Create Repository Configuration Utility (RCU)
  • Create Weblogic Domain
  • Run and Configure the domain

1. Sources Required


1.       JDK 8
2.       Weblogic 12.2.1.0.0
3.       FMW Infrastructure (ADF Runtime)


2. Setup JDK 8

Double click on the jdk .exe file and setup jdk on the path has no space as


Do the same in JRE as


3. Setup Weblogic 12.2.1

-          Open cmd and write this:
/bin/java.exe –D64 –jar
For example:
C:\Java\jdk1.8.0_74\bin\java.exe –D64 –jar C:\12c_sources\fmw_12.2.1.0.0_wls.jar


-          Follow the following screen shots to setup Weblogic 12c


4. Setup FMW Infrastructure

-          Open cmd and write this:
/bin/java.exe –jar
For example:
C:\Java\jdk1.8.0_74\bin\java.exe –jar C:\12c_sources\fmw_12.2.1.0.0_infrastructure.jar


-          Setup infrastructure on the created Middleware folder as shown on these screenshots


5. Create Repository Configuration Utility (RCU)


-          You should know database connection information with sys user before start setup RCU.
-          Open cmd and run “rcu.bat” located on this path (/oracle_common/bin)
For example:
C:\Oracle\Middleware12.2.1\oracle_common\bin\rcu.bat


-          Follow these screenshots to setup RCU


These schema owner will be used when you create weblogic domain.


·         6. Create Weblogic Domain

-          Open cmd and run \wlserver\common\bin\config.cmd
For example:
C:\Oracle\Middleware12.2.1\wlserver\common\bin\config.cmd


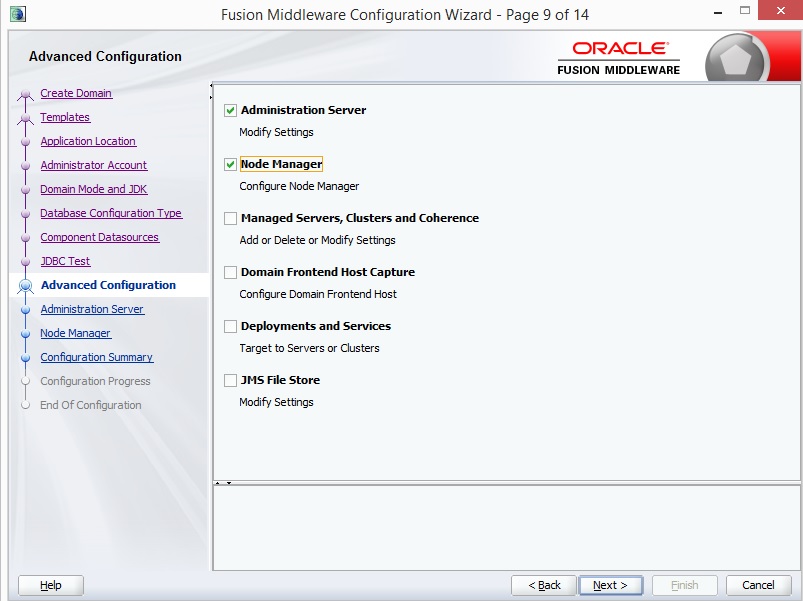
-          Follow these screenshots to create the domain:


  7. Run and Configure the domain


-          Run this command to run AdminServer \ user_projects\domains\\bin\startWebLogic.cmd
For example:
C:\Oracle\Middleware12.2.1\user_projects\domains\ADFDomain\bin\startWebLogic.cmd


-          After successfully running the AdminServer open the browser and open the console from this url http://serverIp:port/console
For example:
 http://weblogic12:7001/console

-          From the console create a ManagedServer and after creating the managed server the JRF libraries automatically will applied to the server so no need to go to em to apply JRFTemplate anymore


-          Create a Machine and add AdminServer and ManagedServer to this machine


-          Install Node Manager services by invoking \user_projects\domains\\bin\installNodeMgrSvc.cmd
For example:
C:\Oracle\Middleware12.2.1\user_projects\domains\ADFDomain\bin\installNodeMgrSvc.cmd
-          You can configure node manager from nodemanager.properties file. You can find this file in this path:
\user_projects\domains\\nodemanager
For example:
C:\Oracle\Middleware12.2.1\user_projects\domains\ADFDomain\nodemanager

Note: if you make any changes in nodemanager.properties file you have to restart node manager services.

-          Shutdown AdminServer and ManagedServer.
-          To increase the ManagedServer memory, you can open setStartupEnv.cmd file from this path:
\user_projects\domains\\bin\
For example:
C:\Oracle\Middleware12.2.1\user_projects\domains\ADFDomain\bin\
In the section if "%STARTUP_GROUP%"=="“ you can configure memory as


-          Run AdminServer and ManagedServer using node manager as:

Ø  Run wlst.cmd from \wlserver\common\bin\wlst.cmd


Ø  Connect to node manager using this command
nmConnect('weblogic','','','','','','ssl')

For example:

nmConnect('weblogic','weblogic1','localhost','5556','ADFDomain',' C:\Oracle\Middleware12.2.1\user_projects\domains\ADFDomain ','ssl')


Ø  Start AdminServer using this command:
nmStart('AdminServer')

Ø  Start ManagedServer using this command:
nmStart('') as
nmStart('ADFServer')


You can download a word document file (.docx) from here