In this blog post, I will delve into the intricacies of Oracle Integration (OIC) provisioning and user access, shedding light on best practices and essential considerations to ensure a smooth and secure implementation.
Provision OIC Instance
1- Login to OCI
with admin role and from main menu slect “Developer Services” à Integration

2- Choose the
Compartment and Region

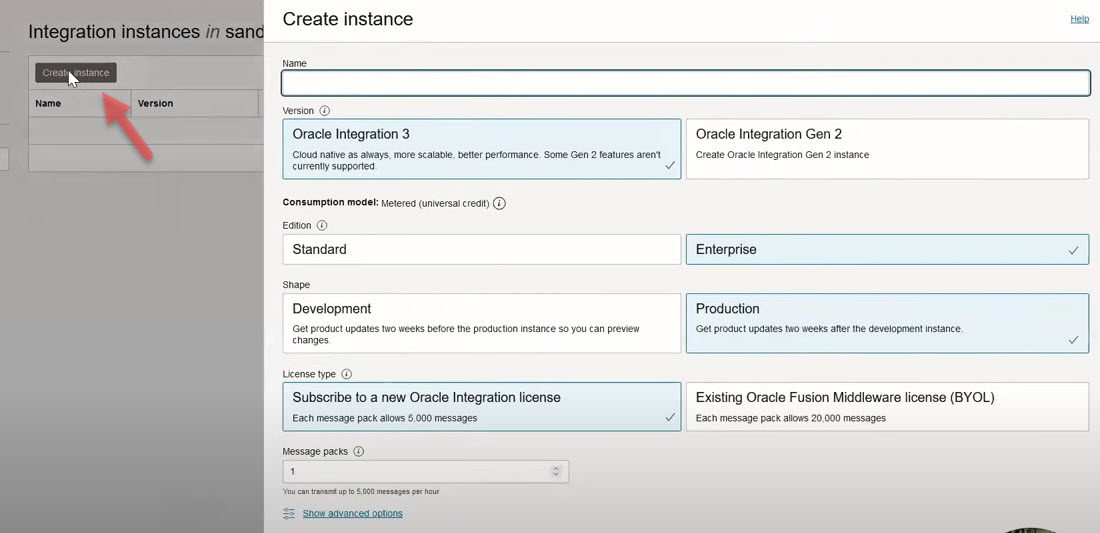
3- Press “Create Instance” and enter the name of the instance and select the relevent options:
ü Select Oracle
Integration 3 as it the latest version
ü Select Standard
or Entrprise (you can start with Standard and switch later to Entrprise at any
time. If you want to use Process Autoation, you should choose Entrprise).
This a quick comparison of capabilities of both Standard and Entrprise

ü Shape
Development or Production (Both are the same but Development will get any
updates two weeks before Production so that you can test changes in DV before
it applied to Production)
ü License either
new license or you can bring your on-prenise license to cloud
ü Message packs.
Min value 1 and max 12. Each message pack give you 5000 messages in an hour.
(You can start with 1 message pack).
ü Press “Create”
4- It will take
few minutes to get your instance provisioned and in active status

5- Click on the
instance and you can open the instance details

6- OCI instance
came with File Server (with 500 GB free with the instance), Visual Builder and
Process Automation (For Entrprise License). By default these features is
disabled but you can enable these features if you want.
7- You can open
Integration console and start working with integration by presson on “Service
Console” button or by coping Service console URL.
8- You can Start,
Stop or Delete the instance from More actions menu

9- You can move
the instance compartment to another compartment by pressing on Move

10- You can change License Edition or message packs number by pressing on Edit button

User
Access
In Oracle Cloud, access is managed with policies. Policies control
access for users in a domain group. However, in OIC you can give access to the
user using Application Roles only without policy as will shown below. So,
define policy for OIC access is not manadatory.
1- From OCI goto Identity à Policies

2- Press “Create Policy” and entered the following to manage OIC instance
Policy syntax to allow to manage integration instance in compartment
Allow group
<group-name> to manage integration-instance in compartment
<compartment-name>
“manage”
mean give group ability to create, delete, edit and move OIC instances
You can use
“read” as shown below, to give user only read-only access to see the OIC
instances in a compartment and see the details of the instance


You can
optional create another policy for OIC observability as shown

Optionally
you can create policy in the integration service level (not group level) for
announcment related to OIC instance (New updates, new release, maintenance…).
The notification announcement will contain announcment from OIC

The
Announcement can be available in OCI notification


Or
announcement can be seen from Oracle Integration Console


3- Application Roles. Once OIC instance is provisioning, in order to give developers or other users access to that particular instance to the instance console, you need to define and assign application roles.
Select Identity & Secuirity àDomains à your domain à Oracle Cloud Services


4- Select OIC
instance

5- From Resource
select Application Roles

6- Expand the
required role and assign user or group. Best to assign Group as shown


No comments:
Post a Comment